How to Install MongoDB (Without Brew) for Mac
I had previously wished I could host a MySQL database on my computer without having to run it 24/7.
The commands give you more flexibility than does Excel, and Store data in a MySQL.
I will cover the steps to install MongoDB (Community Edition) so that you can host a local MongoDB database and use MongoDB shell to connect to other databases.
I largely followed the instructions in this video.
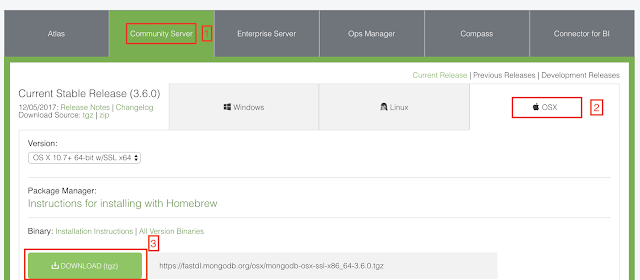
1. Download the MongoDB Software
1. Go to the MongoDB Download Center and click the tab for "Community Server".2. Make sure that you are looking at Community Server for Mac.
3. Download the tgz file for MongoDB Community Server. It is probably best to save it in your home directory (usually Users/You).
2. Install the Software
1. Go to your terminal shell, change directories to wherever the downloaded file is, and unpack the downloaded file by runningtar xvf mongodb-osx-x86_64-3.6.0.tgz. Note that this tutorial is not eternally valid and the version number (currently
3.6.0) will need to be replaced by whatever version number you downloaded. You ought to see something like this:
x mongodb-osx-x86_64-3.6.0/README
x mongodb-osx-x86_64-3.6.0/THIRD-PARTY-NOTICES
x mongodb-osx-x86_64-3.6.0/MPL-2
x mongodb-osx-x86_64-3.6.0/GNU-AGPL-3.0
x mongodb-osx-x86_64-3.6.0/bin/mongodump
x mongodb-osx-x86_64-3.6.0/bin/mongorestore
x mongodb-osx-x86_64-3.6.0/bin/mongoexport
x mongodb-osx-x86_64-3.6.0/bin/mongoimport
x mongodb-osx-x86_64-3.6.0/bin/mongostat
x mongodb-osx-x86_64-3.6.0/bin/mongotop
x mongodb-osx-x86_64-3.6.0/bin/bsondump
x mongodb-osx-x86_64-3.6.0/bin/mongofiles
x mongodb-osx-x86_64-3.6.0/bin/mongoreplay
x mongodb-osx-x86_64-3.6.0/bin/mongoperf
x mongodb-osx-x86_64-3.6.0/bin/mongod
x mongodb-osx-x86_64-3.6.0/bin/mongos
x mongodb-osx-x86_64-3.6.0/bin/mongo
x mongodb-osx-x86_64-3.6.0/bin/install_compass
cd mongodb-osx-x86_64-3.6.0.Now run
cd bin to view the binary files.Note: The two most important files in this directory are "mongo" and "mongod" ("mawn-go-dee").
- "mongo" lets you run the MongoDB shell (called "mongo"). Think of it as a Python shell, but for doing MongoDB stuff. Also, you likely will be using a driver (like PyMongo for Python) instead of mongo.
- "mongod" runs as an actual MongoDB server on your machine. "mongod" stores its data in
.../data/db, but you first have to create this directory. We do that in #3.
sudo bash and entering your password when prompted. Enter
mkdir -p /data/db. The "-p" flag stands for "path" and creates nested directories if they do not exist already (like the
os.makedirs function in Python). 4. Change the permissions on the "data" and "data/db" directories so that everyone may read from, write to them. Do this by running:
chmod 777 /datachmod 777 /data/db
exit. You should still be in the "bin" directory. Now run
./mongod. Here is a good source of info on this. This runs MongoDB locally on your machine (by default at port 27017).
6. To close MongoDB, hold
control + c in the active terminal shell.I next plan to cover an example of using mLab to host a free MongoDB database which we will look at using PyMongo.

Comments
Post a Comment